Business Setup
The Business Setup area is as it sounds - where you can configure and customise SimpleClinic for your clinic!
Access the Business Setup area by clicking on Your Account at the top right of the SimpleClinic window, and selecting the Business Setup option.
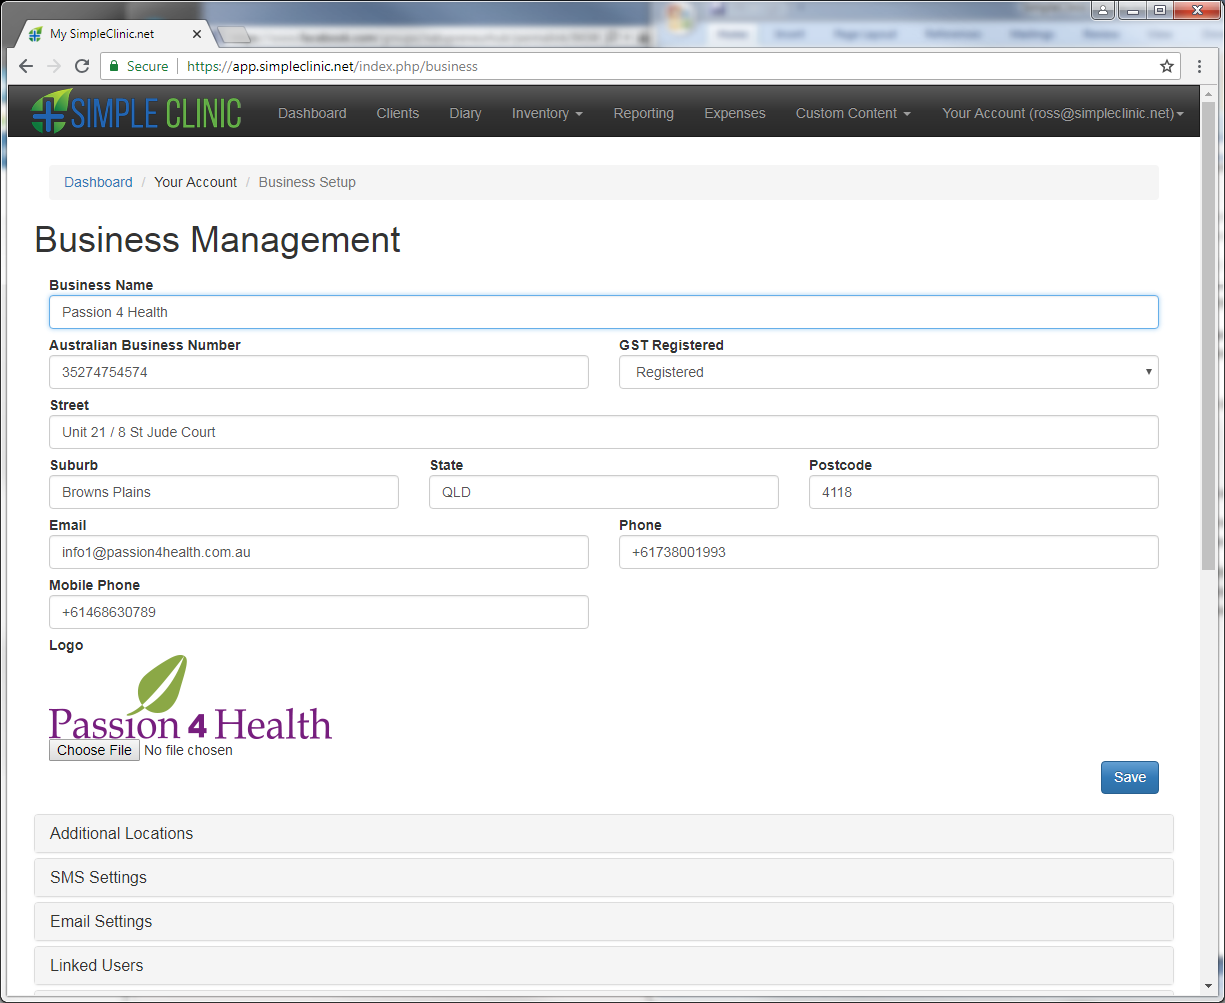
In this section you can enter or change all your clinic details, logo (to use on invoices etc), locations, SMS and email settings, and many other settings used in SimpleClinic.
This manual will not cover all of the setup options, but only the most common areas. If you have any questions about other settings, please contact Support.
Additional locations
SimpleClinic can be configured for multiple locations, whether you have a clinic with multiple locations, or whether you are a practitioner who operates out of multiple clinics.
Click on the Add New button to add a clinic location.
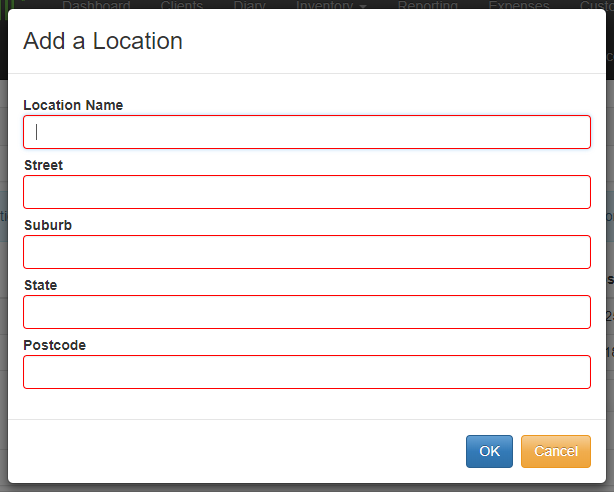
The red boxes indicate that these fields must be filled. Click on OK to save.
If more than one location is added into SimpleClinic, additional fields will be visible in different parts of the application, to allow the selection of which location a booking will be made for, or showing the location on an invoice, or allowing an online booking for a specific location.
If one or more practitioners in the clinic practice from the main clinic location and offer online consultations at another location, you may want to configure additional locations -- one for the main clinic, and one for online consultations. This can allow you to block out the days you work from each location, and make online booking easier! If you do this, remember to also change the opening hours and location for each day in the Employees section, or the practitioner can change this themselves.
SMS settings
This setting enables you to specify the mobile phone number associated with your clinic's outgoing SMS messages for booking confirmations and reminders.
There are a few ways this can be configured in SimpleClinic:
-
Add and verify a mobile phone number -- This can be an existing personal or clinic mobile phone number. There is a process to verify the mobile number which must be done by contacting Support.
-
Using a "sender ID" -- this is an 11-character text string to define your outgoing text messages.
-
Rent a dedicated mobile phone number -- If you do not wish to use a personal mobile phone, or the clinic does not have a mobile phone, you can rent a mobile phone number for sending out text messages. This is an additional cost.
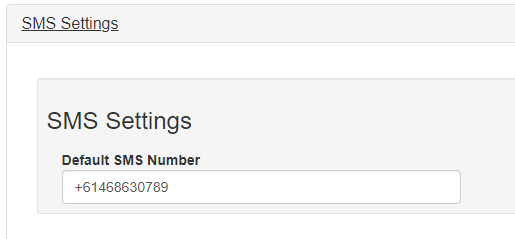
Add or set the mobile phone number, "preceded with "+61"and dropping the first zero of the mobile number, then click on Save (at the bottom of the Business Setup page).
Diary settings
In this section, you can change the design of the SimpleClinic diary, and also the layout of the online booking page, and other related settings!
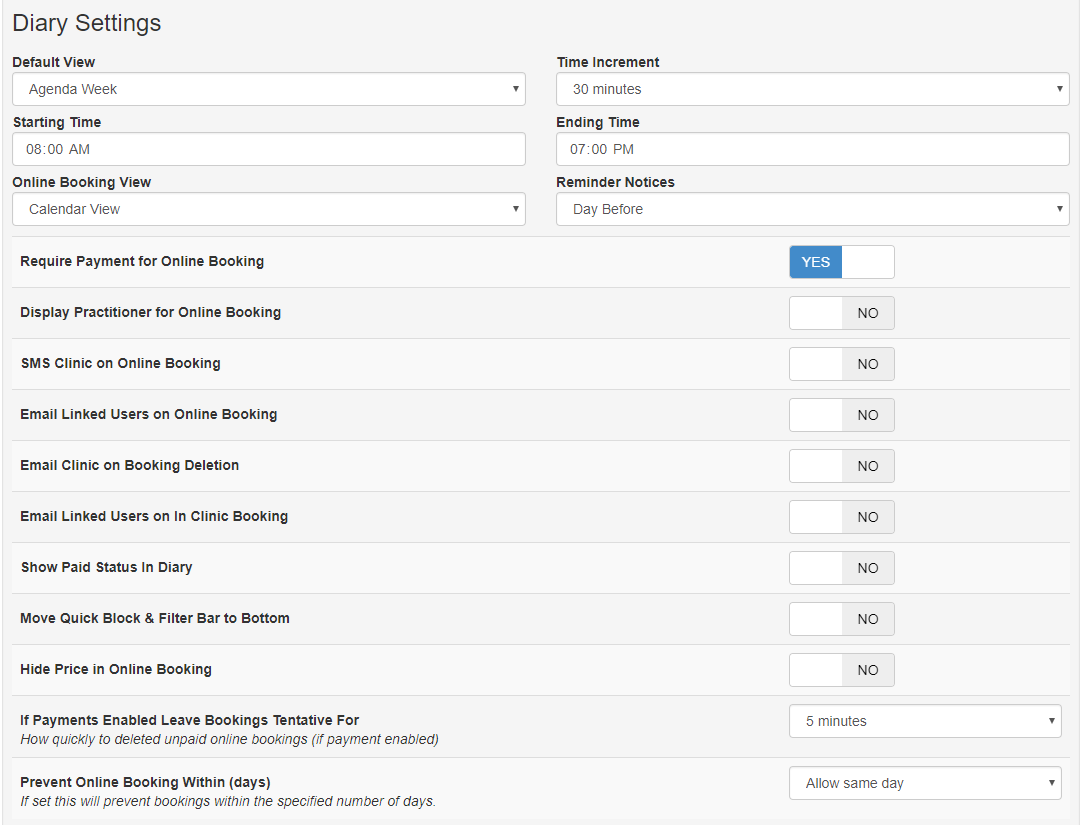
The diary settings on this screen include:
-
Default view -- Whether to display the diary per day, or to see the whole week at a glance.
-
Time increment -- Use this setting to restrict when appointments can be booked. For example, if you only want to take bookings on the hour or on the half hour, change this setting to "30 minutes", or for bookings each 15 minutes, change to "15 minutes". Bear in mind that the smaller you make this setting, the longer the diary screen will be, and you won't be able to view the whole week at a glance.
-
Starting and Ending times -- The diary will be displayed from the Starting time to the Ending time for each day. Bookings can still be made outside of these hours.
-
Online booking view -- SimpleClinic gives you several options for the layout of the online booking page on your website! The options are:
-
"Legacy view" -- Recommended for busy clinics, or those who are booked out a few days or weeks in advance. This option allows for automatic searching of available appointment slots, based on a selected date.
-
"Calendar view" -- Recommended for newer, smaller or less busy clinics. This layout has a cleaner design, but requires the client to manually check on suitable days to find available appointment slots.
-
"Calendar view by Service Category" -- Recommended for those with multiple locations (such as in clinic and online) or having different types of services.
-
-
Reminder notices -- When the SMS and/or email reminder messages will be sent to the client -- 1 day before the appointment, or 2 days before.
-
Require payment for online booking -- Toggle on or off this feature. If set to "Yes" then when a client books their appointment, they will be taken to a payment screen to pre-pay their appointment.
-
Many other diary settings!
-
If payments enabled leave bookings tentative for -- This option sets a timeout duration for online bookings only, and where pre-payment is required for online bookings. This is used if an online booking is saved, but no payment is made. This will save the booking status as \"tentative\", for staff to identify and contact the client for payment, or the booking will time out and be automatically deleted. The booking deletion will be prevented if a payment is made and the admin or reception users mark the appointment as \"confirmed\".
-
Require source on create -- this toggle setting can be used to set whether you wish to force a user to enter the \"source\" for the client record (how the client found the clinic or practitioner) when you create a new client directly from the diary screen.
-
Require Practitioner Link on create -- this toggle setting can be used to set whether you wish to force a user to select the \"practitioner\" for the client record when you create a new client directly from the diary screen.
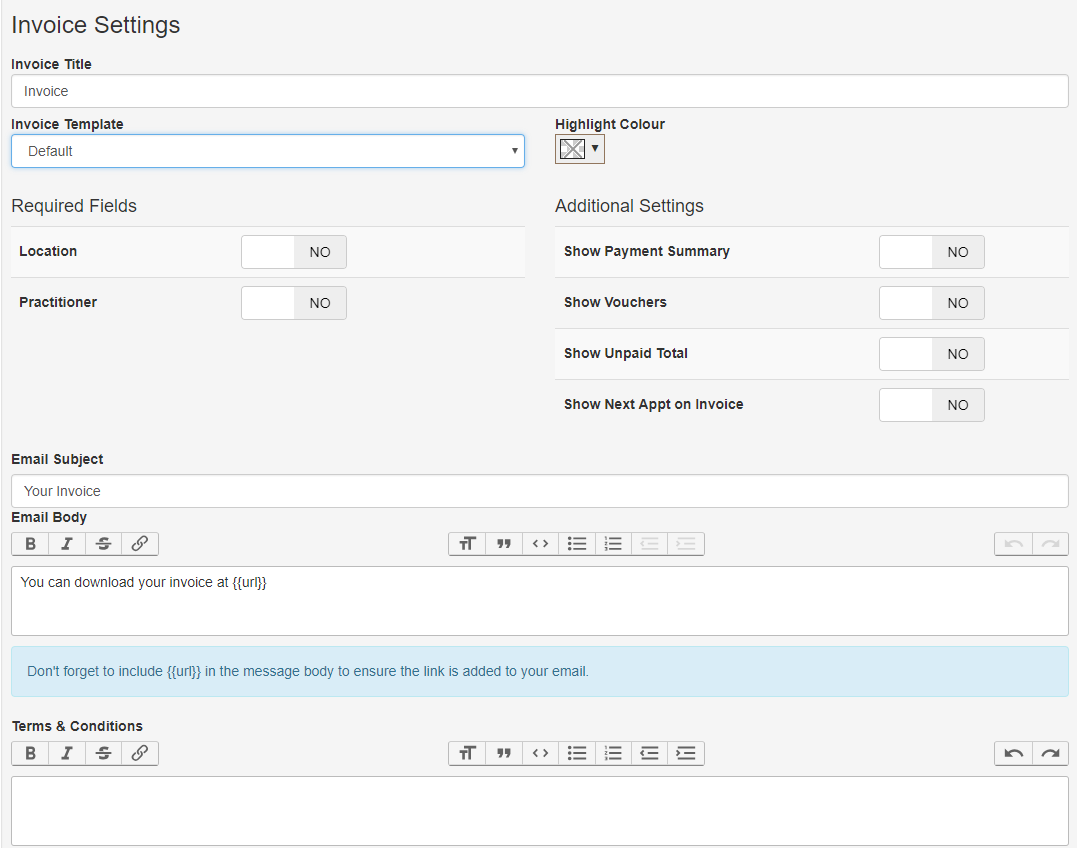
Invoice settings
You can change the layout and design of the invoice given to clients. In the Business Setup area, select the Invoice Settings option.
The options on this screen include the following:
-
Invoice Template -- There may be several choices for the invoice layout. To test these, pick one template and Save the Business Setup settings. Locate an existing invoice for a client, and select to Print the invoice. This will open the invoice layout in another tab. Then return to the Invoice Settings, change the Invoice Template and repeat the process for another or same invoice, and compare the invoice layouts, and change it as preferred.
-
Highlight colour -- Your invoice design can be customised to match your clinic colours using this field.
-
Required Fields -- Default setting = "NO". This section can be used for clinics with multiple locations and multiple practitioners, to make sure that a location and practitioner are picked on the Invoice screen. This may assist in financial reporting across locations and practitioners.
-
Additional Settings - Default setting = "NO". This setting will show a more detailed breakdown of the invoice payment summary on invoices.
-
Email Settings -- You can configure your default email message when sending the invoice to a client via email. Change the email subject and body text as desired, to save you having to do this each time.
-
Terms and Conditions -- You can specify your terms and conditions to be attached to the bottom of each invoice.
Dashboard settings
The daily or monthly sales totals on the Dashboard by default will include and display the amounts of gift vouchers or other pre-paid amounts when they are redeemed. The amounts of the vouchers is shown separately to the cash or EFTPOS amounts taken, so you can confirm the daily takings with what is recorded in SimpleClinic.
Some clinics do not want the details of the redeemed vouchers to be displayed on the Dashboard, and if so, you can turn off the displaying of voucher amounts using the \"Exclude vouchers from Dashboard\" setting in the Business Setup ->Dashboard settings option.
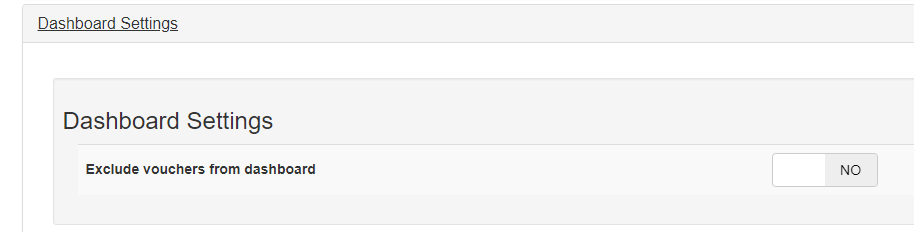
Change the toggle setting to Yes if you want to hide vouchers on the Dashboard. Click on the Save button at the top or bottom of the Business Setup page to save the change.
Bear in mind that if you exclude vouchers from the Dashboard, that what might look like a busy day in clinic with lots of clients may not match the takings, if you use vouchers a lot!
Message settings
This section is where you can configure the booking confirmation and reminder messages to be sent to clients.
By default, a client will receive an email message when they book an appointment, and a reminder email is sent 24 hours before the appointment. If a mobile phone number is configured for SMS messages, the client will also receive an SMS text message on booking and a reminder 24 hours before the appointment.
Email and SMS messages can be personalised to the client with data from the SimpleClinic database, such as the client name, appointment time and more. There can also be different email and SMS messages depending on the appointment type.
NB -- Booking confirmation and reminder messages (by SMS and/or email) are linked to Service Categories. Please make sure that when you create a new service, if you would like clients to receive a message for the service, that you create new messages for the Service Category in this section!
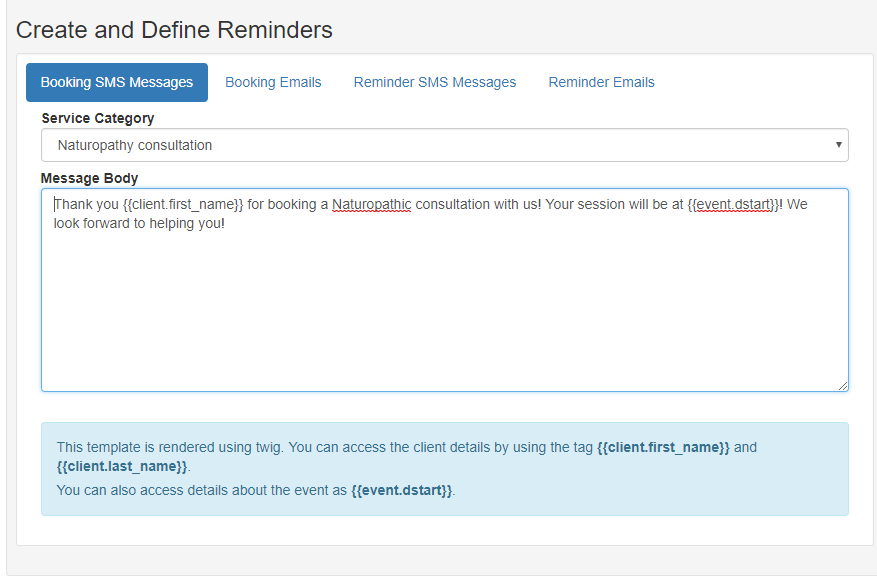
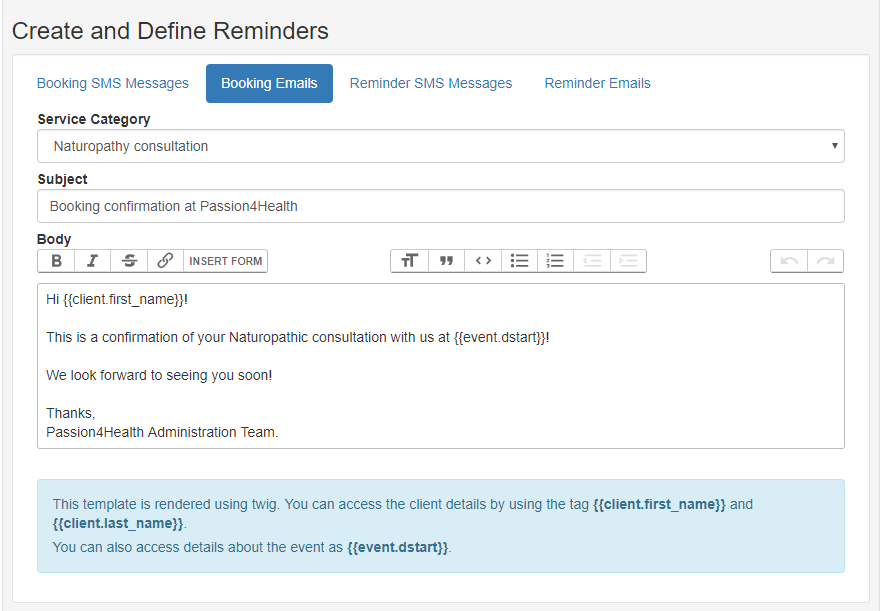
Client or appointment data to be merged into messages must be valid identifiers surrounded by the double bracket characters "{{" and "}}". Then click on the Save button! For more information on these identifiers, please check the Web Support link.
You can also drag and drop a clinic logo picture file into the message Body, in the Booking Email and Reminder Email fields only, but not for the SMS messages!
NB - It would be advisable to check your email and text messages by sending test messages to yourself before using them for clients!